Admin integration
One of the main features of import-export is the support for integration with the Django Admin site. This provides a convenient interface for importing and exporting Django objects.
Please install and run the example application to become familiar with Admin integration.
Integrating import-export with your application requires extra configuration.
Admin integration is achieved by subclassing
ImportExportModelAdmin or one of the available
mixins (ImportMixin,
ExportMixin,
ImportExportMixin):
# app/admin.py
from .models import Book
from import_export.admin import ImportExportModelAdmin

class BookAdmin(ImportExportModelAdmin):
    resource_classes = [BookResource]

admin.site.register(Book, BookAdmin)
Once this configuration is present (and server is restarted), ‘import’ and ‘export’ buttons will be presented to the user. Clicking each button will open a workflow where the user can select the type of import or export.
You can assign multiple resources to the resource_classes attribute. These resources will be presented in a select
dropdown in the UI.
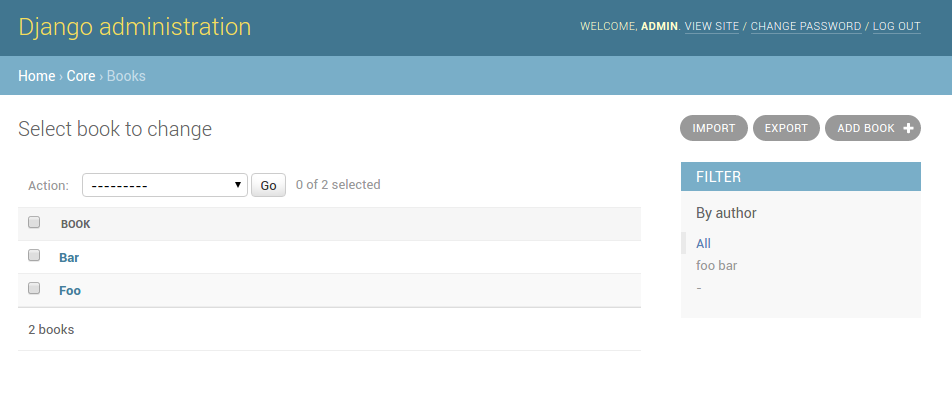
A screenshot of the change view with Import and Export buttons.
Importing
To enable import, subclass ImportExportModelAdmin or use
one of the available mixins, i.e. ImportMixin, or
ImportExportMixin.
Enabling import functionality means that a UI button will automatically be presented on the Admin page:

When clicked, the user will be directed into the import workflow. By default, import is a two step process, though it can be configured to be a single step process (see IMPORT_EXPORT_SKIP_ADMIN_CONFIRM).
The two step process is:
Select the file and format for import.
Preview the import data and confirm import.

A screenshot of the ‘import’ view.

A screenshot of the ‘confirm import’ view.
Import confirmation
To support import confirmation, uploaded data is written to temporary storage after step 1 (choose file), and read back for final import after step 2 (import confirmation).
There are three mechanisms for temporary storage.
Temporary file storage on the host server (default). This is suitable for development only. Use of temporary filesystem storage is not recommended for production sites.
The Django cache.
To modify which storage mechanism is used, please refer to the setting IMPORT_EXPORT_TMP_STORAGE_CLASS.
Your choice of temporary storage will be influenced by the following factors:
Sensitivity of the data being imported.
Volume and frequency of uploads.
File upload size.
Use of containers or load-balanced servers.
Temporary resources are removed when data is successfully imported after the confirmation step.
Warning
If users do not complete the confirmation step of the workflow, or if there are errors during import, then temporary resources may not be deleted. This will need to be understood and managed in production settings. For example, using a cache expiration policy or cron job to clear stale resources.
Customizable storage
If using MediaStorage as a storage module, then you can define which storage
backend implementation is used to handle create / read / delete operations on the persisted data.
If using Django 4.2 or greater, use the STORAGES setting to define the backend, otherwise use IMPORT_EXPORT_DEFAULT_FILE_STORAGE.
You can either supply a path to your own custom storage backend, or use pre-existing backends such as django-storages.
If no custom storage implementation is supplied, then the Django default handler is used.
For example, if using django-storages, you can configure s3 as a temporary storage location with the following:
IMPORT_EXPORT_TMP_STORAGE_CLASS = "import_export.tmp_storages.MediaStorage"

STORAGES = {
    "default": {
        "BACKEND": "django.core.files.storage.FileSystemStorage",
    },
    "import_export": {
        "BACKEND": "storages.backends.s3.S3Storage",
        "OPTIONS": {
            "bucket_name": "<your bucket name>",
            "region_name": "<your region>",
            "access_key": "<your key>",
            "secret_key": "<your secret>"
        },
    },
}
How to format UI error messages
Admin UI import error messages can be formatted using the import_error_display
attribute.
Exporting
As with import, it is also possible to configure export functionality.
To do this, subclass ImportExportModelAdmin or use
one of the available mixins, i.e. ExportMixin, or
ImportExportMixin.
Enabling export functionality means that a UI button will automatically be presented on the Admin page:

When clicked, the user will be directed into the export workflow.
Export is a two step process. When the ‘export’ button is clicked, the user will be directed to a new screen, where ‘resource’, ‘fields’ and ‘file format’ can be selected.

The export ‘confirm’ page.
Once ‘submit’ is clicked, the export file will be automatically downloaded to the client (usually to the ‘Downloads’ folder).
Exporting via Admin action
It’s possible to configure the Admin UI so that users can select which items they want to export:

To do this, simply declare an Admin instance which includes ExportActionMixin:
class BookAdmin(ImportExportModelAdmin, ExportActionMixin):
  # additional config can be supplied if required
  pass
Then register this Admin:
admin.site.register(Book, BookAdmin)
Note that the above example refers specifically to the example application, you’ll have to modify this to refer to your own model instances. In the example application, the ‘Category’ model has this functionality.
When ‘Go’ is clicked for the selected items, the user will be directed to the export ‘confirm’ page. It is possible to disable this extra step by setting the IMPORT_EXPORT_SKIP_ADMIN_ACTION_EXPORT_UI flag.
Note
If deploying to a multi-tenant environment, you may need to use the to ensure that one set of users cannot export
data belonging to another set. See get_valid_export_item_pks().
Export from model instance change form
When export via admin action is enabled, then it is also possible to export from a model instance change form:

Export from model instance change form
When ‘Export’ is clicked, the user will be directed to the export ‘confirm’ page.
This button can be removed from the UI by setting the
show_change_form_export attribute, for example:
class CategoryAdmin(ExportActionModelAdmin):
    show_change_form_export = False
Customize admin import forms
It is possible to modify default import forms used in the model admin. For
example, to add an additional field in the import form, subclass and extend the
ImportForm (note that you may want to also
consider ConfirmImportForm as importing is a
two-step process).
To use your customized form(s), change the respective attributes on your
ModelAdmin class:
For example, imagine you want to import books and set each book to have the same Author, selected from a
dropdown. You can extend the import forms to include author field to select the author from.
Note
Importing an E-Book using the example application demonstrates this.

A screenshot of a customized import view.
Customize forms (for example see tests/core/forms.py):
class CustomImportForm(ImportForm):
    author = forms.ModelChoiceField(
        queryset=Author.objects.all(),
        required=True)

class CustomConfirmImportForm(ConfirmImportForm):
    author = forms.ModelChoiceField(
        queryset=Author.objects.all(),
        required=True)
Customize ModelAdmin (for example see tests/core/admin.py):
class CustomBookAdmin(ImportMixin, admin.ModelAdmin):
    resource_classes = [BookResource]
    import_form_class = CustomImportForm
    confirm_form_class = CustomConfirmImportForm

    def get_confirm_form_initial(self, request, import_form):
        initial = super().get_confirm_form_initial(request, import_form)

        # Pass on the `author` value from the import form to
        # the confirm form (if provided)
        if import_form:
            initial['author'] = import_form.cleaned_data['author'].id
        return initial

admin.site.register(EBook, CustomBookAdmin)
In order to save the selected author along with the EBook, another couple of methods are required.
Add the following to CustomBookAdmin class (in tests/core/admin.py):
def get_import_data_kwargs(self, request, *args, **kwargs):
    """
    Prepare kwargs for import_data.
    """
    form = kwargs.get("form", None)
    if form and hasattr(form, "cleaned_data"):
        kwargs.update({"author": form.cleaned_data.get("author", None)})
    return kwargs
Then add the following to CustomBookAdmin class (in tests/core/admin.py):
def after_init_instance(self, instance, new, row, **kwargs):
    if "author" in kwargs:
        instance.author = kwargs["author"]
The selected author is now set as an attribute on the instance object. When the instance is saved, then the author is set as a foreign key relation to the instance.
Further customization
To further customize the import forms, you might like to consider overriding the following
ImportMixin methods:
The parameters can then be read from Resource methods, such as:
See also
- Admin
available mixins and options.
Customize admin export forms
It is also possible to add fields to the export form so that export data can be filtered. For example, we can filter exports by Author.

A screenshot of a customized export view.
Customize forms (for example see tests/core/forms.py):
class CustomExportForm(AuthorFormMixin, ExportForm):
    """Customized ExportForm, with author field required."""
    author = forms.ModelChoiceField(
        queryset=Author.objects.all(),
        required=True)
Customize ModelAdmin (for example see tests/core/admin.py):
class CustomBookAdmin(ImportMixin, ImportExportModelAdmin):
    resource_classes = [EBookResource]
    export_form_class = CustomExportForm

    def get_export_resource_kwargs(self, request, *args, **kwargs):
        export_form = kwargs["export_form"]
        if export_form:
            return dict(author_id=export_form.cleaned_data["author"].id)
        return {}

admin.site.register(Book, CustomBookAdmin)
Create a Resource subclass to apply the filter
(for example see tests/core/admin.py):
class EBookResource(ModelResource):
    def __init__(self, **kwargs):
        super().__init__()
        self.author_id = kwargs.get("author_id")

    def filter_export(self, queryset, *args, **kwargs):
        return queryset.filter(author_id=self.author_id)

    class Meta:
        model = EBook
In this example, we can filter an EBook export using the author’s name.
Create a custom form which defines ‘author’ as a required field.
Create a ‘CustomBookAdmin’ class which defines a
Resource, and overridesget_export_resource_kwargs(). This ensures that the author id will be passed to theResourceconstructor.Create a
Resourcewhich is instantiated with theauthor_id, and can filter the queryset as required.
Using multiple resources
It is possible to set multiple resources both to import and export ModelAdmin classes.
The ImportMixin, ExportMixin, ImportExportMixin and ImportExportModelAdmin classes accepts
subscriptable type (list, tuple, …) as resource_classes parameter.
The subscriptable could also be returned from one of the following:
If there are multiple resources, the resource chooser appears in import/export admin form. The displayed name of the resource can be changed through the name parameter of the Meta class.
Use multiple resources:
from import_export import resources
from core.models import Book


class BookResource(resources.ModelResource):

    class Meta:
        model = Book


class BookNameResource(resources.ModelResource):

    class Meta:
        model = Book
        fields = ['id', 'name']
        name = "Export/Import only book names"


class CustomBookAdmin(ImportMixin, admin.ModelAdmin):
    resource_classes = [BookResource, BookNameResource]
How to dynamically set resource values
There are a few use cases where it is desirable to dynamically set values in the Resource. For example, suppose you are importing via the Admin console and want to use a value associated with the authenticated user in import queries.
Suppose the authenticated user (stored in the request object) has a property called publisher_id. During
import, we want to filter any books associated only with that publisher.
First of all, override the get_import_resource_kwargs() method so that the request user is retained:
class BookAdmin(ImportExportMixin, admin.ModelAdmin):
    # attribute declarations not shown

    def get_import_resource_kwargs(self, request, *args, **kwargs):
        kwargs = super().get_resource_kwargs(request, *args, **kwargs)
        kwargs.update({"user": request.user})
        return kwargs
Now you can add a constructor to your Resource to store the user reference, then override get_queryset() to
return books for the publisher:
class BookResource(ModelResource):

    def __init__(self, user):
        self.user = user

    def get_queryset(self):
        return self._meta.model.objects.filter(publisher_id=self.user.publisher_id)

    class Meta:
        model = Book
Interoperability with 3rd party libraries
import-export extends the Django Admin interface. There is a possibility that clashes may occur with other 3rd party libraries which also use the admin interface.
django-admin-sortable2
Issues have been raised due to conflicts with setting change_list_template. There is a workaround listed here. Also, refer to this issue. If you want to patch your own installation to fix this, a patch is available here.
django-polymorphic
Refer to this issue.
template skipped due to recursion issue
Refer to this issue.
django-debug-toolbar
If you use import-export using with django-debug-toolbar.
then you need to configure debug_toolbar=False or DEBUG=False,
It has been reported that the the import/export time will increase ~10 times.
Refer to this PR.
Security
Enabling the Admin interface means that you should consider the security implications. Some or all of the following points may be relevant.
Is there potential for untrusted imports?
What is the source of your import file?
Is this coming from an external source where the data could be untrusted?
Could source data potentially contain malicious content such as script directives or Excel formulae?
Even if data comes from a trusted source, is there any content such as HTML which could cause issues when rendered in a web page?
What is the potential risk for exported data?
If there is malicious content in stored data, what is the risk of exporting this data?
Could untrusted input be executed within a spreadsheet?
Are spreadsheets sent to other parties who could inadvertently execute malicious content?
Could data be exported to other formats, such as CSV, TSV or ODS, and then opened using Excel?
Could any exported data be rendered in HTML? For example, csv is exported and then loaded into another web application. In this case, untrusted input could contain malicious code such as active script content.
You should in all cases review Django security documentation before deploying a live Admin interface instance.
Mitigating security risks
Please read the following topics carefully to understand how you can improve the security of your implementation.
Sanitize exports
By default, import-export does not sanitize or process imported data. Malicious content, such as script directives, can be imported into the database, and can be exported without any modification.
Note
HTML content, if exported into ‘html’ format, will be sanitized to remove scriptable content.
This sanitization is performed by the tablib library.
You can optionally configure import-export to sanitize Excel formula data on export. See IMPORT_EXPORT_ESCAPE_FORMULAE_ON_EXPORT.
Enabling this setting only sanitizes data exported using the Admin Interface. If exporting data programmatically, then you will need to apply your own sanitization.
Limit formats
Limiting the available import or export format types can be considered. For example, if you never need to support import or export of spreadsheet data, you can remove this format from the application.
Imports and exports can be restricted using the following settings:
Set permissions
Consider setting permissions to define which users can import and export.
Raising security issues
Refer to SECURITY.md for details on how to escalate security issues you may have found in import-export.